Contact

Name

Email *

Message *

Showing posts with label Dessert. Show all posts

FUDGE LOVER'S STRAWBERRY TRUFFLE CAKE


INGREDIENTS

Cake1 box Betty Crocker™ SuperMoist™ chocolate fudge cake mixWater, vegetable oil and eggs called for on cake mix box

Ganache Filling and Topping2 packages (8 oz each) semisweet baking chocolate, finely chopped1 1/3 cups whipping cream1/4 cup butter (do not use margarine)2 cups cut-up fresh strawberries

Garnish6 fresh strawberries, cut in half lengthwise through stem1/4 cup white vanilla baking chips1/2 teaspoon vegetable oil
DIRECTIONS

Heat oven to 350°F (325°F for dark or nonstick pan). Make and bake cake as directed on box for 13x9-inch pan. Cool completely, about 1 hour.
Meanwhile, in large bowl, place chopped chocolate; set aside. In 2-quart saucepan, heat whipping cream and butter over medium heat, stirring occasionally, until butter is melted and mixture comes to a boil. Pour cream mixture over chocolate; stir until smooth.
Line bottom of 9-inch springform pan with waxed paper. Cut cake into 1-inch cubes. In large bowl, beat half of the cake cubes on low speed until cake is crumbly. Add remaining cake cubes and 1 3/4 cups of the ganache (reserve remaining ganache for topping). Beat on low speed 30 seconds, then on medium speed until well combined (mixture will look like fudge). Fold in 2 cups cut-up strawberries. Spoon mixture into springform pan; smooth top. Cover with plastic wrap; freeze about 45 minutes or until firm enough to unmold.
Run knife around side of pan to loosen cake mixture. Place serving plate upside down on pan; turn pan and plate over. Frost side and top of cake with reserved ganache. Arrange strawberry halves on top of cake.
In small microwavable bowl, microwave baking chips and 1/2 teaspoon oil uncovered on High 45 seconds, stirring every 15 seconds, until melted. Place in small resealable food-storage plastic bag; cut off tiny corner of bag. Drizzle over top of cake. Refrigerate until ready to serve. Best served the same day.


Notes
Source recipes -
Here-
Read Recipe

Cherry Pie with Almond and Oat Crumble


Sweet juicy cherries plus an almond oat crumble make this pie something special. This Cherry Pie with Almond and Oat Crumble just might become your new favorite pie!
Ingredients
  • For the Crust:
  • 1 ¼ cups all-purpose flour
  • 2 teaspoons granulated sugar
  • ¼ teaspoon salt
  • ½ cup (8 tablespoons) unsalted butter, cut into cubes and chilled
  • 3 tablespoons ice-cold water
  • For the Cherry Filling:
  • 6 cups sweet cherries, pitted and halved
  • ½ cup granulated sugar
  • 3 tablespoons cornstarch
  • ¼ teaspoon salt
  • 1 teaspoon almond extract
  • For the Crumble:
  • 1 cup old-fashioned oats
  • ¾ cup white whole wheat flour
  • ¼ cup brown sugar
  • ¼ teaspoon salt
  • 6 tablespoons unsalted butter, cut into cubes and chilled
  • ½ cup sliced almonds

Directions
Make the Crust:
Place flour, sugar, and salt in the bowl of a food processor. Process for a few seconds to combine. Add the chilled butter and pulse 6-8 times, until the largest butter pieces are the size of small peas. Add 3 tablespoons of water and process until the dough just comes together, adding more water a teaspoon at a time if needed. (Alternatively, you can make the dough by hand in a large bowl with a pastry blender or your fingertips.)
Transfer dough to a lightly floured surface (I use a piece of parchment paper) and shape into a round disk. Roll out the dough to a 12-inch round about ⅛-inch thick. Transfer dough to a deep-dish pie plate, by rolling it partway around the rolling pin and then unrolling over the pie dish. Place pie crust in the refrigerator to chill while you make the cherry filling and crumble.
Make the Cherry Filling:
Preheat oven to 375 degrees F.
Place all filling ingredients in a large bowl and stir gently to combine. Set aside while you make the crumble topping.
Make the Crumble:
In a medium bowl, stir together the oats, flour, brown sugar, and salt. Add in the butter pieces and use your fingers to crumble the butter into the oat mixture, until clumps form. Use your fingers to mix in the sliced almonds.
Assemble and Bake the Pie:
Stir the cherry filling to make sure it is well combined. Pour filling into the pie crust, spreading it out evenly. Sprinkle the crumble over the cherries. Bake pie for 25 minutes, cover with a piece of foil, and then bake 25-35 more minutes. Let cool for at least 30 minutes before slicing and serving.

Notes
Source recipes -
Here-
Read Recipe

Chocolate Zucchini Cake with Cream Cheese Glaze


Zucchini breads, loves and muffins are pretty prevalent out there now which is great because the grated vegetable can add much appreciated moistness and a little extra nutrition to these baked treats. I wanted to up the ante on zucchini baking with something a little more indulgent and came up with this moist delicious chocolate cake. The cream cheese glaze looks great on this dark chocolate dessert too but not nearly as good as it tastes as a compliment to the tender delicious cake.

Ingredients
  • For the cake
  • 2¼ cups cake flour (regular flour will work well too in a pinch)
  • ½ cup cocoa
  • 2 tsp baking powder
  • 1½ tsp baking soda
  • pinch salt
  • 3/ 4 cup butter
  • 1 cup brown sugar
  • 1 cup granulated sugar
  • 2 tsp vanilla extract
  • 3 large egg
  • 1/ 2 cup milk
  • 2 cups grated zucchini
  • For the Cream Cheese Glaze
  • 4 ounces (1/2 cup) cream cheese
  • 2 cups powdered sugar (icing sugar)
  • 2 tsp vanilla extract
  • a little milk

Instructions
Grease well and dust with cocoa powder, a standard size bundt pan (or two 8 inch cake pans) Preheat oven to 350 degrees F.
Sift together the flour, cocoa, baking powder, baking soda and salt. Set aside.
Cream together the butter, brown sugar, granulated sugar ans vanilla until fluffy.
Add the eggs, one at a time, beating well after each addition.
Fold in the dry ingredients alternately with the milk.
Always begin and end with the dry ingredients. With the last addition of dry ingredients fold in the grated zucchini.Pour batter into the prepared pan and bake at 350 degrees F for about 40-50 minutes, until a wooden toothpick inserted in the center comes out clean. 8 inch cake pans take about 25-30 minutes.
Cool in the pans for a few minutes before turning the cake out onto a wire rack to cool completely . Top with cream cheese glaze.
To make the Cream Cheese Glaze
Beat ingredients together until smooth. If you think the glaze is too thick, add a teaspoon or two of milk. If it gets too thin, add a little more icing sugar.
Spoon over the cooled bundt cake and let it fall naturally down the sides.
If making this as a layer cake, I recommend using the frosting from our Red Velvet Cake. Notes
Source recipes -
Here-
Read Recipe

The Best Apple Pie is “Just an Apple Pie”


The lesson to be sure, is that some things need no over-complication. There is nothing wrong (and everything right) about “just” an apple pie, so that’s just what I made…but in my preferred style of course.
Ingredients

Pastry:
  • ½ cup very cold butter cut in small cubes
  • ½ cup very cold vegetable shortening cut in small cubes
  • 2½ cups pastry flour (preferable, but all purpose can be used)
  • 2 tbsp brown sugar brown sugar
  • ½ tsp salt
  • ⅓ cup ice water (Use only enough to make a dough form.)
  • 1 tbsp plain white vinegar
  • 1 tsp vanilla extract
  • 1 large egg yolk
  • 1 to 2 tbsp water
Filling:
  • 3 lbs Granny Smith apples, peeled cored and sliced into thick wedges
  • ¼ cup butter
  • 2 cups apple juice
  • ½ cup brown sugar
  • ½ cup white sugar
  • 1 tsp ground cinnamon
  • ½ tsp freshly ground nutmeg
  • 3 tbsp corn starch
  • ¼ cup cold water
  • 1 to 2 tbsp turbinado sugar (optional)

Instructions
To prepare the pastry
Using a food processor or a pastry cutter, cut cold butter and shortening into flour, brown sugar and salt until mixture resembles a coarse meal. Small pieces of butter should still be visible.
Pour vanilla and vinegar into cold water then pour over the mixture and work in by tossing with a fork until dough begins to form. Use your hands as little as possible and work the dough as little as possible.
Divide dough into 2 balls, flatten into 2 rounds, wrap in plastic wrap and place in the refrigerator to rest for a minimum of 20 minutes.You can make your dough the previous day but make sure you take it out of the fridge for 10 minutes to warm slightly before rolling out.
To make the filling
Melt butter in a large non-stick pan over medium heat. Saute the apples for about 5 minutes until the are fully warmed throughout but not falling apart. Set aside to cool for a few minutes.
Meanwhile, simmer the apple juice over medium-low heat. Continue to simmer until the volume of juice has reduced to 1 cup.
Add the reduced juice to the apples and return to the stove top on medium heat to get the mixture boiling, then add the sugars, cinnamon and nutmeg.
Simmer for only a minute before adding a thickening slurry made from dissolving together the corn starch and water.
Stir continuously as you add the corn starch slurry and continue to simmer stirring constantly for about a minute. Remove from heat and allow to cool to room temperature before using to fill the bottom pie crust.
Roll the first dough round into a 12 inch round and place in the bottom of a 10 inch pie plate. Push the dough into the corners and ensure that it is not stretched at all or it will shrink from the edge.
Trim dough to edge of plate. Add the cooled apple pie filling.
Roll the remaining dough round into 12 inch square-ish shape and cut that into 8 or 10 equal strips for the lattice crust top.
Place the remaining pastry strips on top of the apple pie filling, interweaving them to form a simple lattice pattern.
Press the ends of the strips into the edge of the bottom crust and trim the excess with a sharp knife.
Brush the edges of the crust and the lattice top with an eggwash made by whisking together the egg yolk and water.
Sprinkle the lattice top with turbinado sugar if desired.
Chill the pie in the fridge for about 20 minutes to a half hour before placing it on a cookie sheet (to catch any drips from the filling) in a preheated 400 degree F oven. Bottom rack is best.
Bake for 20 minutes at that temperature then reduce heat to 350 degrees F and bake for an additional 30- 35 minutes or until the crust is an even golden brown. The filling need not bubble for this pie to be done.
Allow to cool on a wire rack at room temperature for at least a couple of hours before serving.
NOTE: If your lattice crust edges begin to get too brown wrap them with aluminum foil for the last of the baking time.Notes
Source recipes -
Here-
Read Recipe

Creamy Gingersnap Mango Flan


Ingredients
  • For the Mango Compote
  • 4 large ripe mangoes
  • ⅓ cup sugar
  • For the gingersnap crust
  • 1¼ cups gingersnap cookie crumbs ( I crushed the cookies in a food processor)
  • ¼ cup melted butter
  • 2 tbsp sugar
  • For the baked custard layer
  • Three, 8 oz tubs of sour cream (3 cups)
  • 1 cup sugar
  • 3 large eggs
  • 3 tsp vanilla extract

Instructions
To Prepare the Mango Compote
Peel and dice the mangoes.
Simmer half the mangoes with the sugar over low heat until the mango is softened and beginning to fall apart.
Add the other half of the diced mango and simmer only for an additional few minutes. This method will ensure a good chunky consistency to your finished compote. Cool completely.
To prepare the gingersnap crust
Grease the bottom of a 9 inch spring form pan, lining the bottom with parchment paper to make the flan easier to remove from the pan when baked and cooled.
Mix together the cookie crumbs, butter and sugar until well combined.
Press into the bottom of the prepared spring form pan.
To prepare the baked custard layer
For the custard part of this desert it is important to use full fat sour cream or the filling will not set. I use 18% milk fat sour cream that is sometimes sold as “restaurant style” or “extra thick”.
Whisk together the sour cream, sugar eggs and vanilla extract until the sugar is completely dissolved.
Pour onto the prepared cookie crumb crust and bake at 300 degrees F for about an hour. May need up to 10 minutes more depending on your oven. The custard will still be quite jiggly at the center when done and may be just beginning to brown slightly at the edges, although no color at all is necessary for the flan to be properly baked. (If you think your oven runs on the cool side increase the heat to 325 degrees F.)
Allow the flan to cool to room temperature in the pan then refrigerate for several hours, still in the pan. Remove the flan from the pan to a large flat serving plate before topping with the mango compote and serving.

Notes
Source recipes -
Here-
Read Recipe

Frozen White Chocolate Cream Puffs


This September certainly is a milestone month for Rock Recipes. We will be celebrating our 5th Blog-iversary this month in what is shaping up to be our best traffic month ever.! Thanks so much to all our readers, both veteran and brand new who have supported us along the way. We certainly have a lot to celebrate as we head into Autumn and we have plenty more to come as we are planning new recipes for the Thanksgiving and Holiday season

Ingredients
  • For the choux pastry shells
  • 1 cup water
  • ½ cup butter
  • 1 cup all purpose flour
  • ¼ tsp salt
  • 4 large or extra large eggs
  • For the white chocolate cream filling
  • ¾ cup white chocolate chips
  • 2 cups whipping cream
  • 3 rounded tbsp icing sugar (powdered sugar)
  • 2 tsp vanilla extract

Instructions
To prepare the choux pastry shells
Add the butter and water to a medium sized saucepan and bring to a gentle boil.
Reduce the heat to medium and quickly add the flour and salt all at once, stirring them in quickly to form a soft dough.
Cook this mixture stirring constantly for an additional 3 minutes.
Allow this mixture to cool slightly for about 10 15 minutes before adding the eggs, one at a time, stirring until smooth after each addition.
Cover and chill thoroughly in the refrigerator.
Preheat oven to 400 degrees F.
Drop by rounded tablespoonfuls ( or pipe small mounds using a piping bag ) onto a parchment paper lined baking sheet.
Bake at 400 degrees F for 20 minutes, then reduce the heat to 375 degrees and bake for an additional 15-20 minutes until the puffs are golden brown and do not collapse when removed from the oven. These should be uniformly golden all over with no pale sides and sound hollow when tapped. Cool completely on a wire rack.
To make the white chocolate cream filling
Melt the white chocolate in a double boiler over gently boiling water. Let it cool to almost room temperature.
Beat the whipping cream, icing sugar and vanilla extract to firm peaks.
Gently fold the melted white chocolate into the whipped cream.
Place the white chocolate whipped cream in a piping bag with a star tip or large round tip . Push the tip into the cream puff shell and fill the entire inside of the shell with the cream. If you do not have a piping bag you can also split the cream puff shells in half with a serrated knife and spoon the filling into the top and bottom halves and then putting them back together.
Freeze the cream puffs on a baking sheet for several hours or overnight. Move to an airtight plastic container if you are storing them longer than a day.
Serve with a dusting of powdered sugar and a drizzle of melted white chocolate if you like. Chocolate ganache dipped strawberries make a beautiful presentation with a plate of these cream puffs.
These are also excellent when made at half size as profiteroles and served at a dessert buffet.Notes
Source recipes -
Here-
Read Recipe

Cherry Vanilla Coffee Cake with Cream Cheese Glaze


What better way to welcome the weekend than this moist, delicious coffee cake for breakfast or brunch. The coffee cake is prepared as an upside-down cake and then generously drizzled with a very simple cream cheese glaze. You can use fresh cherries if they are in season or simply use frozen as I did here. The moist buttery cake is so delicious when combined with the sweet cherries and luscious cream cheese glaze. A cake this good shouldn’t be limited to brunch though, I think it would make a spectacular dessert at any great home cooked meal.

Grease and flour a 10 inch cake pan or tube pan very well and preheat oven to 355 degrees F.

Toss together:1/3 cup sugar
1 tsp corn starch

Sprinkle the mixture over:3 cups fresh or frozen pitted cherries
Toss together well and spread evenly into the bottom of the prepared pan.
To prepare the cake batter begin by sifting together

2 cups all-purpose flour
1 tablespoon baking powder
1/4 tsp salt

In the bowl of an electric mixer, beat together at high speed until very foamy
4 large eggs, at room temperature
1 1/2 cups sugar
2 tbsp vanilla extract


In a large measuring cup melt
1/2 cup butter, then mix in
1/2 cup vegetable oil

Slowly add this butter and oil mixture to the egg and sugar mixture as it continues to beat.

Fold in the dry ingredients alternately with

1 cup whole milk, at room temperature

Vanilla Cream Cheese Glaze
2 cups icing sugar (powdered sugar)
4 ounces cream cheese (1/2 a standard Philadelphia brand block)
1 tsp pure vanilla extract
2-3 tsp milk

Beat all ingredients together very well in an electric mixer until very smooth. Add more or less milk to get the glaze to the proper consistency which should be relatively thick but not quite pourable. Spoon the glaze into a piping bag and drizzle over the cake. ( A Ziploc bag with the corner snipped off will work just as well.)Notes
Source recipes -
Here-
Read Recipe

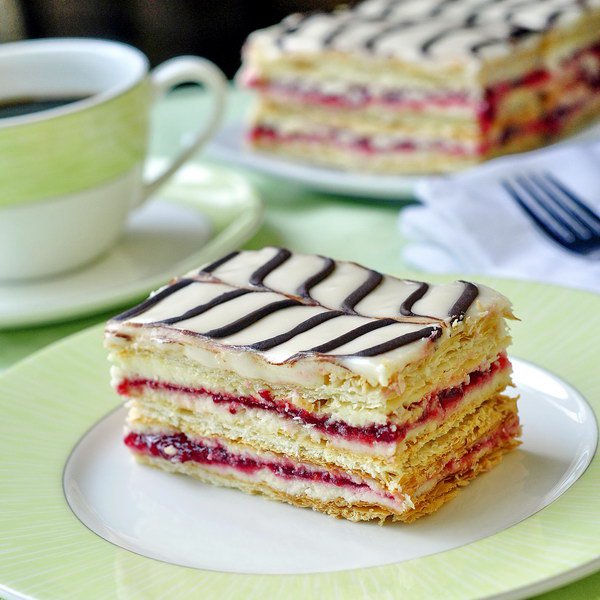
Raspberry Buttercream Mille Feuille


Makes 8 pastries but these are quite rich so I most often cut 16 squares out of them and serve them at that size.
1 pound package frozen puff pastry

Roll out the puff pastry into three 8 inch squares. Place on a parchment lined cookie sheet. You may 
have to bake these one at a time depending on the size of your cookie sheet. Dock the pastry by stabbing holes in it with a fork about every half inch over the entire surface of the pastry. Chill it in the freezer for 10 minutes to ensure that it is well chilled. Puff pastry MUST be baked very cold. Place another sheet of parchment paper on top of the pastry and weight it down with another cookie sheet on top. This keeps the pastry from puffing too much and ensures that it is crispy when baked.

Bake in a preheated 425 degree oven for about 15 minutes. Decrease the heat to 375 degrees F, remove the top pan and top sheet of parchment paper and bake for about another 5 minutes or so until it is evenly medium golden brown throughout. Cool the baked pastry sheets completely before filling.

Vanilla Buttercream Frosting
4 cups icing sugar (powdered sugar
1 cup butter
2 tsp vanilla extract
a few tbsp milk

Blend together until smooth. Only add a little milk at the beginning, then add more if you need it. You want a very thick frosting here. It should still be easily spreadable but as thick as possible is best.
Take one quarter of the frosting and spread it evenly on one layer of the baked pastry. On top of the frosting, spread a thin layer of very good quality
raspberry jam

Spread another quarter of the frosting onto the next sheet of baked pastry and invert it on top of the raspberry jam so that the jam is sandwiched between two thin layers of frosting. This technique helps the completed pastry to hold together better.

Next, spread another quarter of the frosting amount onto the top of the inverted pastry layer, followed by another thin layer of raspberry jam. Finally spread the last of the frosting onto the last sheet of baked puff pastry and invert that onto the raspberry jam. Chill the constructed mille-feuille while you prepare the glaze for the top.

Vanilla Glaze
1 1/2 cups icing sugar (powdered sugar)
1 tsp vanilla extract
milk

Blend together well using only enough milk to bring the glaze to a very thick consistency. The glaze should be just at the point where it almost isn’t pourable but still goes to a flat surface when you stop stirring, even if it takes a couple of seconds to do so. Spread the glaze evenly over the surface of the constructed mille-feuille.
Melt together:
1/4 cup chocolate chips
1 tsp butter

Spoon the melted chocolate into a Ziploc bag and snip the corner off with scissors. The opening should be quite small, about the size of a pencil lead. Draw lines of chocolate all across the surface of the glaze, parallel to each other and about a half inch apart. Using the back of a knife or a toothpick, draw lines perpendicular to the chocolate lines across the surface of the glaze, about every inch, alternating the direction of the lines as you go.

Chill the completed mille-feuille for at least a couple of hours, preferably longer. Trim all four edges of the pastry so that you have straight sides before cutting into 8 rectangles or 16 squares. The trimmings are the bakers bonus,

Notes
Source recipes -
Here-
Read Recipe

Strawberry Cobbler Squares


This is a great idea for summer picnics or make a terrific brunch item. If you are feeding a large crowd, a double batch of these will fill a cookie sheet and provide up to 2 dozen servings. These can also be served warm with ice cream as a delicious summer dessert.

Makes 1 dozen (but they can be cut smaller of you prefer)

Strawberry Filling2 pounds fresh or frozen strawberries
1/2 cup sugar
1/2 cup apple juice
Clean the strawberries and cut them into quarters. Bring to a slow simmer with the sugar and apple juice for just a few minutes. Thicken the filling with a slurry made from mixing together:
3 rounded tablespoons corn starch
1/4 cup cold water

Add the slurry slowly stirring constantly. Allow the filling to boil slowly for one minute after all of the slurry has been added, continuing to stir. Remove from heat and cool completely. NOTE: The water content of strawberries can vary, so the amount of thickening slurry can also vary. Use enough of it to bring the filling to the consistency of lemon curd or pudding. If you need to make a little more thickening slurry or use a little less, that is fine.

Cobbler Pastry
In a food processor pulse together:

2 1/2 cups flour
1/2 cup sugar
1 tsp baking powder
1/4 tsp baking soda

Pulse in:
1/2 cup cold butter cut in small cubes

Process until the mixture resembles fine crumbs. A pastry blender can be used instead of a food processor or cut the butter in with a couple of knives or even just rub it in with your fingers. If using your fingers, chill the crumbs before adding the wet ingredients.

Whisk together:1/2 cup milk
1 tsp vanilla
1 egg

Pour onto the dry ingredients and mix together until a soft dough forms. If you need to add a little extra milk or flour that’s fine. Lightly grease a 9×13 inch baking pan (or half sized cookie sheet). Roll half of the dough to about 11 x15 inches and place in the bottom and about an inch up the sides of the pan. Fill the bottom crust with the prepared cooled strawberry filling.

Roll out the other half of the dough to just larger than 9×13 inches and place on top of the filling. I find the best way to add the pastry layers is to rolled the rolled out dough into a log and then unroll it in the bottom of the pan or on top of the filling.

Pinch the edges of the bottom and top pastries together to seal and tuck the edges down.

Whisk together:
1 egg
2 tbsp water

Brush the top of the pastry with a thin layer of the egg wash (you will not need all of it). With a small sharp knife, cut a few slits int he surface of the top pastry. Bake in a preheated 350 degree F oven for 35 – 40 minutes or until the top is evenly golden brown. Cool completely before cutting into large squares.


Notes
Source recipes -Here-
Read Recipe

Rum Truffle Strawberry Cheesecake


Sometimes friends and family get Christmas Day dessert as a gift from our family on Christmas Eve and this year did not disappoint with this Rum Truffle Strawberry Cheesecake. It has been a bit of a tradition at our house for the past few years. Putting too many on that list can turn into a logistical nightmare so a selection of the bounty from our annual November freezer cookie blitz is now most often what this lucky list now receives.

Strawberry Compote Topping
2 cups fresh or frozen strawberries
1/2 cup sugar
Combine in a saucepan and bring to a very gentle boil. Thicken with
1 1/2 tbsp corn starch dissolved in
¼ cup cold water
which is added to the strawberries while stirring gently. Boil gently for 1 additional minute, stirring constantly. Cool completely for several hours in the fridge.
Cookie Crumb Crust
In a small bowl, combine:
1 1/3 cups chocolate cookie crumbs
3 tbsp sugar
1/3 cup melted butter
Press into the bottom of a lightly greased or parchment lined 9 inch spring form pan. (Grease bottom only!) Parchment paper is ideal here because it makes it very easy to release the cheesecake from the bottom of the pan.

Cheesecake
Cream together:
3 eight ounce packages ounces cream cheese
1 cup sugar
Add, one at a time
3 eggs
beating well after each addition. Add:
3 tsp vanilla extract
Finally blend in:
1 cup whipping cream

Pour over the prepared base and bake in a bain marie at 300 degrees F for 60-70 minutes. (Learn about using a simple bain marie by clicking here.) The cheesecake does not have to brown at all in order to be fully baked; the surface of the cheesecake should lose any shine when the cake is properly baked. It can still be slightly wobbly just at the center at this point.

Remove the cake from the oven and run a sharp knife completely around the edge of the pan. This will allow for the cheesecake to shrink as it cools and hopefully not crack (but who cares if it does? I am never bothered by a crack or two in the surface) Allow the cheesecake to cool thoroughly on a wire rack at room temperature. (NOT in the fridge). Refrigerate after fully cooled. Chill for several hours or overnight.

Rum Truffle Ganache
The rum truffle ganache is used to cover the cheesecake and to dip the strawberries.
2 cups dark chocolate chips (or semisweet)
1/2 cup whipping cream
3 tbsp dark rum, optional (or 1 tsp rum extract)
Melt together, just until smooth in a double boiler. Do not over heat. Just as it is melted remove from the heat. Dip in:
10 -12 large strawberries
Place the dipped strawberries on a piece of parchment paper or wax paper and chill until ready to garnish. Pour the remaining ganache over the chilled cheesecake and spread very quickly and evenly over the top and sides with a flat spatula. Return the cheesecake to the fridge to chill again.
Vanilla Whipped Cream
2 cups whipping cream
3 rounded tbsp icing sugar (ie powdered sugar, confectioners sugar)
1 tsp vanilla extract


Notes
Source recipes -
Here-
Read Recipe

Cinnamon Roll Couronne


I love this particular version of cinnamon rolls, so I had no worries about using this recipe and the look of the finished couronne was absolutely beautiful. A little drizzle of vanilla glaze over the circular loaf and it made an absolutely perfect centerpiece for my brunch table. I was really pleased that it turned out so well and happy that I had taken enough photos of the process to be able to share it with my readers.
  • 1 ¼ cups warm milk
  • 3 cups all purpose flour
  • 1 pkg (5 g) instant dry yeast
  • 3 tbsp melted butter
  • 2 tsp vanilla extract
  • ¼ tsp salt
  • ¼ cup sugar
  • 2 eggs, slightly beaten

Combine 2 cups of the flour along with the sugar, instant yeast and salt in a large bowl or in the bowl of a large electric mixer that uses a dough hook. Add the melted butter, warm milk, eggs and vanilla extract. Using a wooden spoon or the regular paddle of your electric mixer beat for 4-5 minutes until the mixture is smooth with no lumps. If using an electric mixer, switch to the dough hook at this point and begin to slowly incorporate the remaining 1 cup of flour. If not using an electric mixer keep mixing in the flour gradually until a soft dough forms that leaves the sides of the bowl. You may need to use a little less or a little more flour, this is not uncommon. Knead the dough for an additional 10 minutes either in the electric mixer or on a bread board or counter top

Cover dough and leave to rest and rise for 30 minutes to one hour.

Punch the dough down and knead it for a few minutes by hand before letting it rest for another 10 minutes.

Use the photos provided as a guide to the process described to form the couronne.

Roll the rested dough out into a large rectangle about 12x 24 inches.

Combine:
1 1/4 cups brown sugar
2/3 cup very soft butter
3 tsp cinnamon

Spoon the mixture evenly over the surface of the rolled out dough and spread it to about a half inch from the the edges. Sprinkle on:
1 to 1 1/2 cups golden raisins (optional)
Starting at the long side of the rectangle, roll the dough into a log, pinching the dough together to seal at the long seam of the roll.


Cut the log in half lengthwise, laying the two pieces of dough side by side on the counter top, with both cut sides facing up. Start lifting one pice of dough over the other to form the twist, being careful to keep the cut sides pointing upward as much as you can. Form the fully twisted dough into a circle, tucking the ends of the roll under each other. Transfer the couronne onto a large parchment lined baking sheet at least 12 inches wide. I used a 14 inch flat sheet with no sides which works best.

Cover the baking pan with a clean tea towel and allow the couronne to rise until at least doubled in size, about 1 1/2 hours.

Bake at 350 degrees F for 40-45 minutes or until evenly golden brown all over. Cool for about 20 minutes before drizzling with vanilla glaze and serving warm.

Vanilla Glaze
1 cup icing sugar
½ tsp vanilla extract
2 tbsp milk

Whisk all three ingredients together until smooth and drizzle over the couronne

Notes
Source recipes -
Here-
Read Recipe

Cinnamon Roll Bread Pudding

Read Recipe

Chocolate Chip Cookie Dough Cheesecake


The cookie dough in this recipe is the same as used in those decadent cheesecake cookie bars. It should be should be very cold when it’s folded into the cheesecake batter so be sure to make it an hour or more in advance of the rest of the recipe.

Cookie Dough
Cream together very well:
1/2 cup butter
1/3 cup white sugar
1/3 cup dark brown sugar
1 1/2 tsp vanilla extract

Fold in just until a dough forms:1 cup plus 2 tbsp flour
pinch salt

Finally mix in:1 cup chocolate chips

Chill the dough in the fridge for at least an hour.

Break off small nuggets of the dough about the size of the top of your forefinger. Place them on a parchment lined tray and keep chilled in the fridge. About 3/4 of these dough nuggets will go into the cheesecake batter. Reserve the other 1/4 to garnish the cheesecake after it is baked, cooled and glazed.


Cookie Crumb Crust
In a small bowl, combine:
1 1/3 cups graham cracker crumbs
3 tbsp sugar
1/3 cup melted butter
Press into the bottom of a lightly greased or parchment lined 9 inch spring form pan. (Grease bottom only!) Parchment paper is ideal here because it makes it very easy to release the cheesecake from the bottom of the pan.
Vanilla Cheesecake

Cream together:
2 eight ounce packages ounces cream cheese
2/3 cup sugar
Add, one at a time
2 eggs
beating well after each addition. Add
2 tsp vanilla extract
Finally blend in
1/2 cup whipping cream
Fold in 3/4 of the chilled cookie dough pieces. Pour over the prepared base and bake at 300 degrees F for 60 – 70 minutes. The cheesecake does not have to brown at all in order to be fully baked; the surface of the cheesecake should lose any shine when the cake is properly baked. It can still be slightly wobbly just at the center at this point.

Remove the cake from the oven and run a sharp knife completely around the edge of the pan. This will allow for the cheesecake to shrink as it cools and hopefully not crack (Allow the cheesecake to cool thoroughly on a wire rack at room temperature. (NOT in the fridge). Refrigerate after fully cooled.

Top with chocolate ganache and vanilla whipped cream as well as the reserved cookie dough pieces.

Chocolate Ganache

In a small saucepan, heat almost to boiling:
1/3 cup whipping cream

Remove from heat and pour in
1 1/3 cups chocolate chips

Let stand for 5 minutes, then stir until smooth. Pour evenly over the cheesecake when it is still in the pan. Return to the fridge to let the chocolate set.

Vanilla Whipped Cream
1 cup whipping cream
3 rounded tbsp icing sugar (powdered sugar)
1 tsp pure vanilla extract

Beat to firm peaks and use to garnish the edges of the cheesecake. If you don’t have a piping bag just cut a half inch opening off the corner of a large Ziploc bag and use that to squeeze the whipped cream onto the cheesecake.

Notes
Source recipes -
Here-
Read Recipe

Skor S’mores Cupcakes


Ingredients
For the graham crumb bases¾ cup graham wafer crumbs
1½ tbsp granulated sugar
3 tbsp melted butter
For the chocolate cupcake batter1 cup sugar
1 cup all purpose flour
¼ cup + 2 tbsp cocoa
1 tsp. baking powder
½ tsp baking soda
½ tsp salt
1 egg
½ cup soured milk (1 tsp vinegar in ½ cup milk)
½ cup black coffee
¼ cup vegetable oil
½ tsp vanilla extract
½ cup semi sweet chocolate chips
For the chocolate ganache topping½ cup chocolate chips
1 ounce of whipping cream
To top each cupcake
½ to 1 tsp Skor toffee chips

Instructions
For the graham crumb basesMix together the crumbs, sugar and butter well
Spoon the crumbs evenly into the bottoms of a paper lined 12 cupcake pan and press them down firmly into the bottom.
For the chocolate cupcake batter
Combine all ingredients except chocolate chips in a mixing bowl and beat with electric mixer for 2 minutes.
Spoon evenly into the prepared cupcake pans.
Sprinkle each cupcake with a few of the chocolate chips.
Bake at 350 degrees F for 15-20 minutes or until toothpick inserted in the center comes out clean.
Cool completely before spreading on the chocolate ganache.
For the chocolate ganache topping
In a small double boiler melt together the chocolate and until smooth but not overheated. I use a small metal bowl over a small pot of simmering water.
Spread a thing layer on each of the cupcakes
To finish the cupcakes
Sprinkle the cupcakes with the toffee chips and add a few miniature marshmallows.
Brown the marshmallows with a butane kitchen torch or by watching them carefully on a rack about 6 inches from the broiler. Don’t overdo it. A little color is all you need.
Garnish each cupcake with a small piece of graham cracker if you like.

Notes
Source recipes -
Here-
Read Recipe

Mango Spice Banana Bread

Read Recipe

Hummingbird Cake


Ingredients
For the cake3 cups flour
1 cup white sugar
1 cup brown sugar
½ tsp salt
1 tsp baking soda
1½ tsp baking powder
3 eggs
1 cup canola oil
1 cup crushed pineapple
1 cup roughly chopped toasted pecans (Toast pecans for 5 minutes at 350 degrees for 5 minutes tossing twice before chopping)
3 medium size bananas, ripe but firm NOT MUSHY (cut in quarters lengthways and cubed)
2 tsp cinnamon
1 tsp nutmeg
2 tsp vanilla extract
1 tsp butterscotch flavoring (optional)
For the Cream Cheese Frosting1 cup cream cheese
½ cup butter
½ cup shortening
2 tsp vanilla extract
8 cups icing sugar
2-4 tbsp milk

Instructions
For the cakePreheat oven to 350°. Grease two 8 or 9 inch round cake pans and line bottoms with parchment paper. Grease the paper as well and dust the pans lightly with flour.
Sift together flour, salt, baking soda, baking powder, cinnamon and nutmeg.
Mix the sugars, eggs, vanilla, butterscotch flavouring and oil until light and fluffy. Stir in the crushed pineapple. Fold in the dry ingredients until not quite completely mixed. Finally fold in the chopped nuts and chopped bananas.
Divide equally between the 2 prepared cake pans and bake for about 30-35 minutes or until a toothpick inserted into the center comes out clean. Turn out of pans and cool completely on a wire rack before frosting with cream cheese icing.
To Make the cream cheese frosting
Combine all ingredients together and beat until smooth. Add only enough milk to bring the icing to a creamy spreadable consistency.
Like carrot cake, because of the frosting, this cake should be stored in the refrigerator. I like to take it out a half hour or so before serving to let the frosting soften a little.

Notes
Source recipes -
Here-
Read Recipe

Apple Crisp or Crumble – Back to Basics


Ingredients
For the fruit layer8 small to medium sized apples
⅓ cup white sugar
2 tsp corn starch
½ tsp cinnamon
½ tsp nutmeg
1 tsp vanilla extract
3 tbsp melted butter
For the crumble layer1 cup all purpose flour (or whole wheat flour)
1 cup large rolled oats
½ cup brown sugar
1 tsp baking powder
¾ cup cold butter, cut in small cubes

InstructionsTo prepare the apple layerPeel, core and cut the apples into thick wedges.
Mix together the sugar, corn starch, cinnamon and nutmeg until well combined then toss together with the apples.
Stir together the melted butter and vanilla extract. Pour over the apples and once again, toss together well.
Transfer the prepared apples to an ungreased 8x8 glass baking dish or one of similar size. I sometimes use a deep dish pie pan.
To prepare the oatmeal crumble top
Preheat oven to 350 degrees F.
Mix together the flour, baking powder, brown sugar and rolled oats. Rub this together with your hands to break up any lumps in the brown sugar.
Add the cubes of cold butter and start pinching them together with your fingertips and incorporating them into the dry ingredients until the mixture forms a a ball like cookie dough.
Press small handfuls of the dough into balls, then break off small pieces of the dough, about the size of the top of your thumb, and scatter them evenly all over the surface of the prepared apple layer. Do not press them down at all. They will settle naturally as the crumble bakes. This is key to getting a crispy crumble.
Bake in the preheated oven for about 45 minutes. The apple layer should be bubbling and the surface of the crumble should be an even medium golden brown. If you are using a shallower, slightly larger baking pan like a 9x9, watch it closely, the crumble may be done in 5 or 10 minutes less time.

Notes
Source recipes -Here-
Read Recipe

Chocolate Poke Cake with Fudge Sauce


Ingredients
For the Chocolate Velvet Cake1 cup sifted all purpose flour
1¼ cups sifted cake flour
½ cup cocoa
½ teaspoon baking soda
1½ tsp baking powder
1 teaspoon salt
1½ cups sugar
⅔ cup vegetable oil
⅓ cup vegetable shortening at room temperature
3 tablespoons good quality vanilla extract (if you want pure white use clear vanilla extract)
3 large eggs
1½ cups buttermilk
For the Chocolate Fudge Sauce2 cups white sugar
¾ cup sifted cocoa
pinch salt
½ cup corn syrup
¾ cup melted butter
1¼ cups undiluted evaporated milk (no water added) (not sweetened condensed milk)
1 tsp vanilla extract
For the Vanilla Whipped Cream2 cups whipping cream.
4 rounded tbsp icing sugar (powdered sugar)
1 tsp vanilla extract
½ cup chopped chocolate bar ( for garnish, optional)

Instructions
To prepare the Chocolate Velvet CakeSift together both flours, cocoa, baking soda, baking powder, salt and sugar. Set aside.
Grease and flour a 9x13 inch baking pan.
In the bowl of an electric mixer beat together the vegetable oil, shortening and vanilla. Beat well at high speed with whisk attachment until light and fluffy
Beat the eggs in one at a time.
Fold in the dry ingredients alternately with the buttermilk.
I always add dry ingredients in three divisions and liquid ingredients in 2 divisions. It is very important to begin and end the additions with the dry ingredients. Do not over mix the batter. As soon as it has no lumps in the batter, pour into the prepared 9x13 inch baking pan.
Bake at 325 degrees F for 30-35 minutes or until a wooden toothpick inserted in the center comes out clean. Allow the cake to cool in the pan.
For the Chocolate Fudge Sauce
You will need only about half of this recipe but the remainder can be stored in the fridge in a sealed container fro a couple of weeks to be enjoyed on ice cream sundaes or to use on a second cake later.
In a medium sized saucepan, stir all of the ingredients together.
Bring to a very gentle boil, stirring occasionally.
Simmer for five minutes. Watch it very closely, it can foam up and boil over if the heat is too high or the pot too small. This is not a recipe to walk away from.
Remove from the heat and let cool to room temperature.
Store in an airtight container in the fridge for up to 2 weeks.
To make the Vanilla Whipped Cream
beat the cream, icing sugar and vanilla together at high speed with an electric mixer until stiff peaks form.
To put the cake together
Using the round handle of a wooden spoon, poke holes into the cake, stopping about a half inch from the bottom of the pan. These holes should be about ¾ of an inch apart.
Pour 1½ cups of the chilled fudge sauce evenly over the cake. Frost immediately with the vanilla whipped cream and garnish with about ½ cup chopped chocolate bar if you like.
Notes
Source recipes -
Here-
Read Recipe

Coconut Velvet Cake


Ingredients
For the Cake1¼ cups sifted all purpose flour
1½ cups sifted cake flour
½ teaspoon baking soda
1½ tsp baking powder
1 teaspoon salt
1½ cups sugar
⅓ cup vegetable oil
⅓ cup vegetable shortening at room temperature
1 tsp good quality vanilla extract
2 tsp pure coconut extract
3 large eggs
1½ cups coconut milk
¼ cup milk
Approximately 1 cup dried coconut (sweetened or unsweetened, uour choice)
For the Frosting4 egg whites
¼ tsp cream of tarter
1 tsp vanilla extract
1½ tsp pure coconut extract
1¼ cups sugar
½ cup corn syrup
¼ cup water
Approximately 1 cup dried coconut (sweetened or unsweetened, your choice)

Instructions
To make the cakeGrease and flour 2 nine inch round cake pans and line the bottom with 2 circles of parchment paper. Sift together both flours, baking soda, baking powder, salt and sugar, Set aside.
In the bowl of an electric mixer beat together the vegetable oil, shortening, vanilla and coconut extract. Beat well at high speed with whisk attachment until light and fluffy
Beat the eggs in one at a time.
Mix together the milk and coconut milk.
Fold in the dry ingredients alternately with the coconut milk mixture.
I always add dry ingredients in three divisions and liquid ingredients in 2 divisions. It is very important to begin and end the additions with the dry ingredients. Do not over mix the batter. As soon as it has no lumps in the batter, pour into the two prepared 9 inch cake pans.
Bake at 325 degrees F for 30-35 minutes or until a wooden toothpick inserted in the center comes out clean. Allow the cake to cool in the pans for 10 minutes before turning out onto wire racks to cool completely.
To prepare the Coconut Marshmallow Frosting
In a small saucepan combine sugar, corn syrup and water.
Bring to a boil over medium heat and continue to cook until the mixture reaches 240 degrees F on a candy thermometer or when a teaspoonful of the mixture dropped into ice water forms a soft ball that holds its shape when cool.
Whip the egg whites, cream of tartar and vanilla and coconut extracts to soft peaks in a large bowl.
With the mixer on medium high speed, slowly begin to pour the sugar syrup down the side of the egg white bowl in a thin continuous stream.
Continue to whip the frosting until it forms stiff peaks.
Frost your cake immediately with this frosting while it is still slightly warm as it is easier to spread smoothly than if allowed to cool completely.
Immediately cover the top and sides of the cake with the dried coconut. You can use sweetened coconut here if you like. Toasted coconut is good if you use unsweetened dried coconut. The sweetened coconut tends to burn more easily when toasted. To toast unsweetened coconut, preheat the oven to 350 degrees F and spread the coconut on a baking sheet. Bake for about 5 -7 minutes or until the coconut begins to turn golden brown. I like to toss the coconut once or twice during the baking tome to ensure even browning.

Notes
Source recipes -
Here-
Read Recipe